Today, the 27th of October 2015, would have been my mother's 91st birthday. She passed away more than 6 years ago but my memories of that sad trip back home on February of 2009 has remained vivid to me like it happened just yesterday. Before I headed back to Melbourne, a brother asked me to look through my mom's things to see if I had wanted anything. I took with me the simplest of things...mostly things that reminded me much of my childhood - her 1960s pinking shears, a rusty, broken Our of Lady of Lourdes rosary (which I quickly repaired when I got home), old photographs, hers and my dad's wedding rings (for safekeeping), and this tattered cookbook...
 |
| Nora Daza's Let's Cook with Nora |
The fact that I can remember this book in our kitchen shelf from when I was a child must mean that it's likely a first edition (the book being first published in 1969). Surely, I have browsed through these pages hundreds and hundreds of times in my lifetime!
One of the cake recipes in the book is that of a prune cake. To be honest, I never was interested in trying out this cake BUT since it's my mom's birthday and I particularly remember that she loved snacking on prunes, I thought, why not?
If you are familiar with the prune walnut cake of Becky's Kitchen, then you'd most likely recognize this.
 |
| Actual prune walnut cake of Becky's Kitchen (Image credit: Flickr) |
To make the cake this way, I did not follow Nora Daza's recipe to a T. First of all, I had to obviously add walnuts to the cake batter. Also, I had to scale the recipe down as I only wanted a small cake.
One thing I found unnecessary was stewing the prunes (as instructed in the recipe) because the prunes I bought were already pitted and very soft (as in mashable soft).
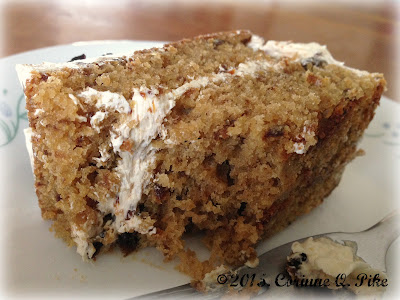
I made a few other minor changes to some of the other ingredients then I was ready to bake. If you are skeptical like I was before about a cake with prunes, then you have got to just trust me on this one - you will love it! The cake is tender and moist and because it has prunes, it must be good for you, right? :)
PRUNE WALNUT CAKE (suitable for a 7x7 pan)
Ingredients:
1 1/4 cups sifted cake flour
1/2 tsp baking powder
1/2 tsp baking soda
1/4 tsp salt
1/2 cup unsalted butter, softened
3/4 cup caster sugar, divided
2 large eggs, separated
3/8 cup buttermilk
1/2 cup soft, pitted prunes, chopped/mashed
1/2 cup coarsely chopped walnuts
**optional: 1/2 tsp ground cinnamon (if you like a touch of cinnamon taste to your cake!)
Procedure:
Preheat oven to 180 degC. Grease and flour a 7x7 cake pan and line the bottom with baking paper.
In a small bowl, whisk cake flour, baking powder, baking soda, and salt (and ground cinnamon, if using).
In a mixing bowl, using a paddle attachment, cream butter and 1/2 cup of the caster sugar until light and fluffy.
Add in the eggyolks one at a time.
In three additions, beat in the flour mixture and buttermilk alternately.
Blend in the prunes and beat just until combined.
In a separate bowl, whisk the eggwhites until frothy. Gradually add in the remaining 1/4 cup sugar. Beat until eggwhites form stiff peaks.
.
Fold eggwhites into flour mixture in three additions. With the last addition, fold in the walnuts as well.
Pour into prepared pan and bake for about 45 minutes or until a skewer inserted into the middle of the cake comes out clean and/or the cake sides are just starting to pull away from the pan. Do not overbake!
Take cake out of the oven and let rest in a wire rack for about 10 minutes then invert and release from pan. Let cool completely in the wire rack.
 |
| NOTE: Unlike chiffon, this cake does not rise much so don't expect a tall cake! |
To assemble the cake:
1. Make Swiss meringue buttercream using the procedure here but with these ingredients:
2 eggwhites
1/2 cup white sugar
150 grams unsalted butter, softened
pinch of salt
1/2 tsp vanilla extract
Alternatively, you can opt to make the easier Old-fashioned butter icing with these ingredients:
150 grams unsalted butter, softened
pinch of salt
1/2 cup evaporated milk
1/2 cup granulated white sugar
1/2 tsp vanilla extract
2. Fit a smalll piping bag with a petal tip 104. Or if you have a ruffle tip 88 (like the one I used), you can also choose that. Fill it with about 1/2 cup of the buttercream.
 |
| This is tip 88. |
3. Beat in 1/3-1/2 cup of mashed prunes into the remaining buttercream. Now you have a prune flavoured version!
4. Cut your cake horizontally in half. Place top half, cut side up, on a cake board.
5. Spread a thin layer of prune buttercream.
6. Top with the other cake half, cut side down.
7. Cover the whole cake with the rest of the prune buttercream, (I skipped crumb coating this time.)
8. Using a cake comb, make wavy patterns on the cake sides and top.
9. Using the buttercream in your piping bag, pipe ruffles/garlands along the cake sides.
10. Divide the cake top into three sections by piping straight ruffles from bottom to top.
11. Take 6 whole pitted prunes, flatten them slightly and cut 2 slits on one side of each.
12. Arrange half walnuts and prunes alternately on top of the straight ruffles.
Give it a go!


