Monday, June 17, 2013

Angel Food Cake

Three weeks ago, I decided to stop selling cakes.  You might think that was really crazy of me to do BUT the thing is, I am just plain tired. I just wanted to get away from the pressure and stress for a while.  For how long, I don't know.

I kind of shocked and disappointed the people around me, especially the ones who regularly asked me to make cakes for them.  They thought something bad had happened.  That I was sick or had a problem.  Someone even thought I was pregnant!  It was difficult for them to understand that I just wanted some time off and that this wasn't a decision I made out of impulse. They were hoping this break wasn't going to be a permanent thing.

That's something I couldn't promise.  Because you know what? I don't miss it.  I don't miss the constant ringing of my phone.  I don't miss the late nights.  I don't miss the people going in and out of my house.  I don't miss the nonstop baking and cleaning up. I don't miss the cakes, period. 

I still bake though.  But only what I want to and when I want to.  For my family this time. Although I have been constantly baking bread and whipping up ice cream, for the last three weeks, I had avoided anything that had to do with cake.  Honestly, I didn't have the slightest desire at all.

Today, however, I was compelled to make one. With the ongoing ensaymada experimentation, I had a growing number of spare eggwhites that I didn't want wasted.  So I made an angel food cake. The recipe I used is another one that I copied off my aunt's old notebooks.


I know the cake isn't much to look at. Don't let the brownish, flawed outside appearance fool you.


What more can I say?  Eggwhites well used.  


ANGEL FOOD CAKE (suitable for a 10x4 tube pan)

Ingredients:
1 1/2 cups egg whites, room temperature
1 1/2 cups white granulated sugar, divided
1 1/2 teaspoons cream of tartar
1/4 teaspoon salt
1 cup cake flour
1 teaspoon flavouring of your choice (ex. vanilla, almond)

Procedure:
1. Preheat oven to 180 degrees C.
2.  In a small bowl, sift together the cake flour and 3/4 cup of the sugar.  Set aside.
3.  In a large mixing bowl, beat eggwhites, cream of tartar and salt till frothy. Gradually add in the remaining 3/4 cup sugar and the flavouring and beat until stiff.
4.  Gently fold in the cake flour/sugar into the meringue 3 tablespoons at a time.  Fold only until the flour/sugar mixture disappears.
5.  Pour batter into an ungreased 10x4 tube pan.  Push the batter to the sides of the pan and level off.
6.  Bake for about 40-45 minutes or until a skewer inserted into the center of the cake comes out clean.  Cracks should feel dry.
7.  Take out of the oven and immediately invert onto a glass bottle and cool completely.


 8.  Carefully loosen cake sides with a knife and invert cake into a serving plate.  Enjoy as is or with whipped cream, ice cream or fresh fruits!


Tuesday, June 4, 2013

French Macarons

I had a love affair with macarons not too long ago.  But sadly, that quickly died.  I realized it wasn't really the macarons I was in love with it.  It was just all about the challenge.  Once I found the recipe that gave me consistent results and I got used to the technique, the excitement was gone.

Excited or not though, if one has an excessive amount of eggwhites to spare, there is no reason not to make macarons, is there?

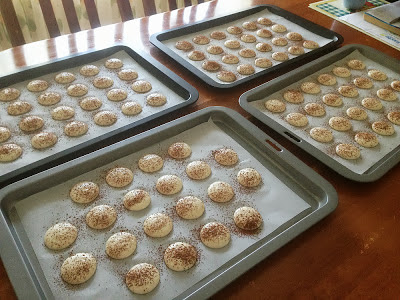
Basic French macarons dusted with cocoa powder and filled with Nutella
As it has been a long while since I last made them, I wasn't quite sure I still knew how!  Lots of people have been asking me to share the recipe that I use.  I have been apprehensive to do so because I believe that a good recipe is just one small factor in successful macaron making. What works for me will not necessarily work for everyone else.  There are a whole lot of other factors involved like mastery of technique, the weather, your oven, etc.


Since I am far from being a macaron expert and cannot give definite pointers myself, I suggest that before embarking on this endeavor, especially if it is your first time, for you to read a LOT about macaron making, watch videos, and compare various recipes.  Although I bought so many books on macarons, I found this and this as the most informative as far as tips, tricks and troubleshooting are concerned. This video helped me as well.

Lastly, I cannot stress enough how important practice is.  Do not be discouraged if your macarons do not turn out right the first, second or third time.  Most people make batches and batches before they are able to perfect it. I know I did!

Although majority of bakers would probably say that the Italian meringue method is more foolproof than the French, I still prefer the latter. The recipe below has worked very well for me in my own kitchen.  I hope it will for you too!  (I'm sorry I did not include a recipe for the filling. I will leave that up to you, ok?)

BASIC FRENCH MACARONS
(makes 40-45 filled macarons)

215 g almond meal
215 g pure icing sugar
Pinch of salt
150g eggwhites (aged for at least 1- 2 days)
100 g granulated sugar
5g powdered eggwhite
1/2 tsp cream of tartar

Place almond meal, icing sugar and salt in a food processor and process in short pulses until finely ground. Sift mixture into a bowl.

Combine granulated sugar and powdered eggwhite. In a medium bowl and at medium speed,  beat eggwhites and cream of tartar until foamy. Gradually add in the sugar/powdered eggwhite then beat mixture at high speed until stiff.

Using a spatula or a scraper, fold in the almond meal/icing sugar into the meringue.  Cut into the meringue then fold up and over. Make sure to scrape the sides and bottom of the bowl. Once the batter falls back into the bowl in a thick ribbon, it  is ready to be piped.

Line 3-4 baking trays with baking paper. Place template under baking paper of one sheet. (Download a TEMPLATE such as this.) Fill a piping bag fitted with a 1/2" plain round tip with the macaron batter. Pipe rounds onto the baking tray using the template as a guide. After piping, carefully pull out the template.


Tap the baking tray onto the counter a few times to break any bubbles and to help the macarons settle.  Do the same for the other baking trays.

Let the macarons rest for about 30-60 minutes or until the tops are quite firm and dry to the touch.

Preheat oven to 180 degrees C. Right before putting a baking tray in, lower the temperature to 155 degrees. Bake 10 minutes then turn the tray around.  Bake for a further 8-10 minutes.  Remove the tray from the oven and let the macarons cool down for a few minutes before peeling off from the baking paper.

Before putting the next tray in,  bring the oven temperature back up to 180 degrees.

Sandwich cooled macarons with your desired filling.

Have fun and good luck!