I had always seen her mixer uncovered and her birthday is in a couple of days...so guess what I decided to make for her?
 |
| There's no mixer underneath. The cover is so thick and sturdy, it holds its shape perfectly and stands up on its own. |
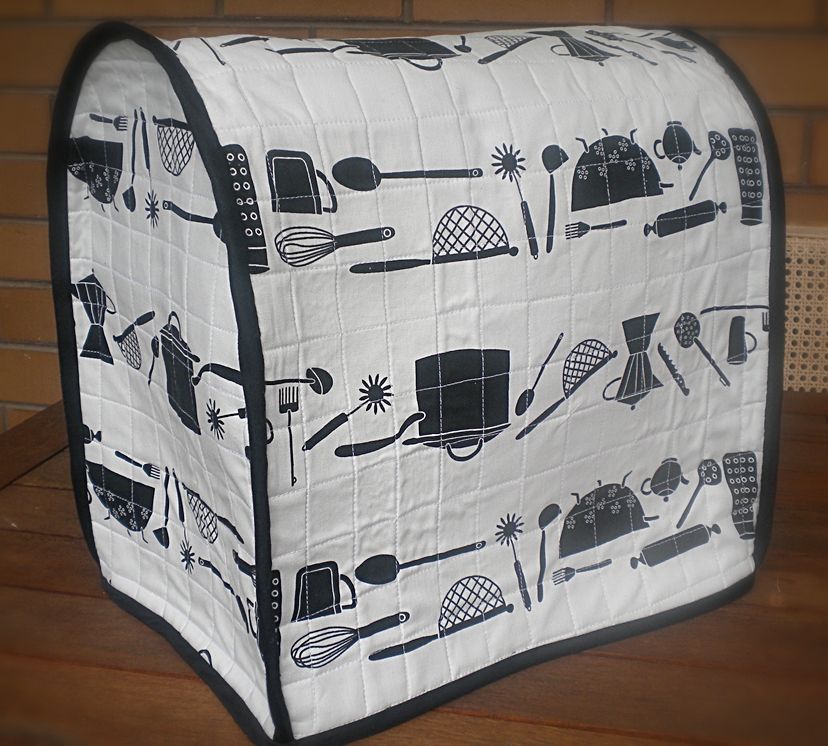 |
| My fabric has directional prints, so as you can see, the design on the main body is upside down on this side. I should have taken the photo from the other side! |
This is one of those things I wish I could keep for myself, not only because the cover turned out very pretty, but mainly because of the amount of work I put into it. First of all, I am not a quilter so I was quite impatient with the quilting part of the process. And why on earth I did so many lines when I could have done less, I really don't know. Another thing is that I have a fear of bias binding and I also don't quite enjoy hand sewing. I have in fact avoided having to deal with bias binding for the longest time. Having said that though, it turned out there was nothing to fear after all. (But I did prick my fingers a few times.)
What made the whole project easier was that I already had an existing pattern. If you remember, I made a cover for my own KitchenAid mixer sometime ago. The way I made that one is actually different (this new one is way better), but the fabric pieces are basically the same.
So, ok. The title of this post suggests that I have a tutorial for this mixer cover. I call it a mini tutorial because I did not take photos as I sewed. This will not be as detailed as my other tutorials so some experience in sewing is quite vital. I am afraid beginners might get lost somewhere. Basically, I will just be providing you with the pattern, the material requirements, and the general steps on how to make your own cover. Please take note that my cover was made for a 5 quart KitchenAid ARTISAN mixer.
MINI TUTORIAL: How to Make a KitchenAid Mixer Cover
Requirements:
1 meter quilting weight cotton fabric for outer cover (non-directional prints preferred)
1 meter quilting weight cotton fabric for lining **
1 meter sew-in cotton or polyester batting
quilt basting spray
about 5 meters double fold bias tape in coordinating colour
matching thread
other sewing essentials such as scissors, needles, ruler, marker, pins, sewing machine, etc.
** This cover is reversible. If you want a change in look every now and then, choose a pretty lining fabric.
Procedure:
1. Download pattern for the front/back panel here. With Page Scaling set to NONE, print out the pattern pages. Cut out the pattern pieces just outside the thick black lines and glue together as instructed.
Please take note that since the patterns were drawn with thick marker, you may find slight discrepancies in the measurements. Please countercheck with indicated measurements and adjust accordingly, if necessary.
After assembling the pattern pieces, you should have something like this:
 |
| This is the complete pattern for the front/back panels of the mixer cover. |
2. From main fabric, lining, and batting, cut the following:
2 pieces each - 16"(L) by 11"(W) for the front and back panels
1 piece each - 36"(L) by 16"(W) for the main body
3. For the front, back and main body panels, sandwich batting between the lining (wrong side up) and the main fabric (right side up). Following the manufacturer's instructions, use quilt basting spray to temporarily adhere layers together.
4. Quilt panels as desired. (In my cover, the horizontal and vertical lines are about 1 1/4" apart.)
5. Using the pattern piece as a guide, cut the front and back panels to size. Trim the main body to 34 3/4" (L) by 15" (W).
6. To assemble the cover:
Start with the front panel. Find and mark the center of the curved top. With lining sides together, match the center of one long edge of the main body panel with the center of the front panel. Pin together starting from the top, then go down the sides. Machine sew using a 1/4" seam allowance.
Do the same with the back panel.
7. Apply bias tape to the front and back seams. (I machine sewed the bias tape on one side and hand sewed the other side for a neat finish.)
8. Finish off by applying bias tape along the bottom edges.
Was that understandable? Frankly, I am not used to writing a tutorial without loads of pictures to go with it, so I hope that was clear enough. The structure of the mixer cover is really very simple. Quilting and bias binding did complicate the whole thing just a bit. You may opt not to quilt or maybe you can use stiff interfacing instead of batting. It's up to you.
Anyway you choose, hope these instructions will be of some help. Happy sewing! And happy baking too!

Excellent Corinne. Tx. This has just made my Xmas sewing list!!
ReplyDeleteAwesome!! I linked to your tutorial over at Craft Gossip Sewing:
ReplyDeletehttp://sewing.craftgossip.com/tutorial-kitchenaid-mixer-cover/2010/11/30/
--Anne
I am looking forward to making one for my kitchen, after christmas. I have a cheap Walmart cover.
ReplyDeleteI love it. I just got a Kitchenaid mixer and as soon as I can decide how I'm going to decorate my kitchen, I can now make a cover for my mixer. Thanks!
ReplyDelete~Jenny~
How perfectly giftable and I LOVE the fabric! Thanks so much, I'll be linking.
ReplyDeleteAnd useful when you're too lazy to claen the mixer itself before company comes! ;D
ReplyDeleteVery nice cover and a great tutorial. Thanks for sharing...I may take my Kitchen Aid out of the cabinet now since it can look so nice and be kept clean on the counter top. I would use it more often too. That thing is heavy.
ReplyDeleteI've been wanting to make a cover for mine a very long time now, maybe this will give me the incentive to get it made!
ReplyDeleteThank you! I have been looking for a pattern for a mixer cover that would be big enough and this looks like it will do the trick. My mother in-law will be getting one for Christmas. I am new to the blogging world and just started my own but not sure what i will do with it yet. http://purelysimpledesigns.blogspot.com
ReplyDeleteThank you very much <3
ReplyDeleteWow, that is great. Thanks for sharing this. I have my mums old one from her Kenwood that she made out of gingham in the 60s. It is sad and does not fit well on my kitchen aid. I think I will reference it in this, and use vintage gingham from her cupboard!
ReplyDeletelorraine, thanks 25reasons too!
I sooo need to make this for my mixer...thanks for this post
ReplyDeleteLoved this tutorial! I saw it some time ago but finally got around to making my mixer cover this morning and it's perfect. I skipped quilting (too lazy LOL) so it's not as stiff as yours but I like how it turned out. It's just perfect. Thanks bunches!
ReplyDeleteLove the material you picked out! Thanks for sharing your talents and what a genius thought to make it reversible!! So clever :). Thanks!
ReplyDeleteMy husband just bought a Kitchen Aid Mixer. I am a quilter and I will use the pattern and instructions. Thank you very much. I am looking forward to doing this project. This is what I was looking for. Love the reversible idea.
ReplyDeleteI used this pattern just a few minutes ago and it came out fantastic. I am not a sewer and was able to make it. I did not enjoy the quilting so next time I will buy already quilted material. Thank you so much for a wonderful tutorial.
ReplyDeleteBobbie from Tennessee
Made this tonight-- your instructions ROCK!!!! It came out GREAT! Thank you so much!!!!!!!!! Jen from Gettysburg
ReplyDeleteThanks for posting the pattern online.
ReplyDeleteI made this last night. Thanks so much for the pattern! It turned out super nice. I added pockets on one side to store the attachments.
ReplyDeleteJust made one! Very easy to follow instructions! Thanks for sharing!
ReplyDeleteTrying to make this and have it two sided. One side Christmas fabric and one side Alabama fabric. I am to the point of attaching the front and back panel to the center piece. Haven't been successful, yet getting the pieces eased together to sew. I'm going to try it again this morning. Easy to follow pattern.
ReplyDeleteThank you so much for this. I got a new mixer a few months ago but didn't get a cover because I wanted to make one. This will help so much!
ReplyDeleteI'm definitely bookmarking this page to make as a Christmas present for my mom! I'm only 15, but I'm pretty competent with her sewing machine, so I hope this will be a nice surprise, especially if I can make a matching toaster cover too! Thanks for this!
ReplyDeleteIs there any chance you can recall the fabric you used? It is just so cute!
ReplyDeleteI have only a small piece left of this fabric and there are no markings on it. Sorry!
DeleteIf the print on the fabric is a one-way design, then cut the center piece in half and turn one piece. Add enough for the seam that will be across the top in the middle.
ReplyDeleteYou are an amazing talent and thank you so much for sharing that with the rest of us.
ReplyDeleteI'm going to embroider the Apple Pie Recipe on both sides of one layer on the center piece, then put Cupcake appliques on the reverse side. I have an apple pie recipe with apples fabric for the front and back, then a solid neutral color for the center for both sides. Thank you for the instructions.
ReplyDeletelovely fabric! i was looking for a pattern for my thermomix. this i can transfer :-) thanks!
ReplyDeletepami
Perfectly understood instructions, thank you Corinne. My gift to me for Christmas.
ReplyDeleteplease where i found NONE? can you see where i found? and please can you write centimentri i don't know inch... i'm live in italy! :* thanks!
ReplyDeletePrint the pattern in ACTUAL SIZE.
DeleteKindly convert the measurements as I have no time to do this right now. Just multiply everything by 2.54. That will be your dimensions in centimeters.
Thanks so much for this great tutorial.
ReplyDeleteMy artisan mixer came with the pouring shield. Will this cover of yours accommodate this ? Great pattern, want to also add a pocket. Thanks.
ReplyDeleteYes, it will accommodate the pouring shield.
Deletei'm not sure how to page scale, could someone explain please?
ReplyDeleteYou don't need to scale it. Just print in Actual Size.
DeleteI would like to thank you for sharing your pattern. I am a PhD student, and rarely acquire nice things; so, when I do, I try to take care of them to the best of my ability. I saw the KitchenAid brand cover for $49.99 (which was out of the question), and while searching for a solution, found your site. I'm not the best sewer in the world, so (hopefully) this pattern will help.
ReplyDeletewill this be plenty big enough to fit a 6 quart kitchenaid mixer? ive never had a stand mixer and never made a cover lol but a church friend asked if i could make her one for her new mixer so im researching :p
ReplyDeleteThis cover was made for a 5 quart mixer. I don't know how much bigger in size a 6-qt mixer is, sorry.
Deleteok thanks :)
DeleteI was admiring your nice neat sewing, and then I saw your cakes. Truly amazing! Thank you for posting this pattern. Can I ask what width double fold bias tape you used? Thank you!
ReplyDeleteMy bias tape is 2" wide (unfolded).
DeleteI sure love this tutorial! I am not sure what meters are but will figure it out! Your cover turned out amazing and I thank you very much for writing this tutorial!
ReplyDeleteThank you! It´s a great pattern!
ReplyDeleteHi, we have the same mixer and in desperate need of a cover too. What if I wanted the cover clear? Like hard plastic cleae? Rather than with a pattern. Could i still use the same pattern? Ill have it sewn by a pro because i dont know anything about sewing. ��
ReplyDeleteYes, you can use the pattern.
DeleteAwesome! Is there any way to Pin this? Just askin! Thanks, Lodi
ReplyDeleteI would use large paper clips to hold the binding and clear plastic together (instead of pins, no holes is made in the plastic), then remove as sewing needle getting close to the next paperclip.
ReplyDeleteI dont know how to sew, can I order from you?
ReplyDeleteI'm sorry but I don't sell these.
DeleteThank you for sharing this. I believe that I will be making several versions of this (toaster, coffee pot, tea cozy etc)as well as some pot holders oven mits. Perhaps some in coordinating materials so that am not overwhelmed with one pattern or color only.
ReplyDeleteThis is a fabulous tutorial does this fit over the mixer and plastic pourer cover/guard?
ReplyDeleteI am halfway through sewing this cover. The instructions were VERY easy to follow and everything matched up perfectly. Thanks for the pattern!!!
ReplyDeleteGreat pattern, clear and easy directions. I love that it can be made reversable too. I will also be sewing some of the extra bias binding together along the edges, then using it to make simple handles in the middle-top of both sides of the cover -- to make it quick to pull off the mixer.
ReplyDeleteGreat item! Thank you!
This is perfect! I will see how this turns out made from two layers of recycled denim quilted together.
ReplyDeleteThanks for the pattern! My grandson is a budding chef, so he's getting a Kitchen Aid for Christmas & I'm planning to make him an embroidered chef's apron & mixer cover to match. I have to find measurements for the Bowl- Lift model, to be sure it will fit. The covers available have a deep pocket on the outside, but the contents will still get dusty, so I plan to add a top flap (it won't need to fasten closed) & I like someone's suggestion for handles. I'm considering to make one end with a zipper, so if it's a tight fit under the cabinets, the cover can slide off. Those 2 alterations will probably mean it won't be reversible, but a nice print will still look nicer.
ReplyDelete** I would add a tip for those making a clear vinyl cover, you'll need a Teflon or roller presser foot, as plastic sticks to the machine bed & Feet.
** For those who don't sew, they should check with relatives or a local quilt group for someone to make one for them.
Thanks again, Corinne!
For those sewing a clear plastic cover that may not have a special sewing foot, try using a layer of gift wrapping tissue. I cut narrow strips, line them up with the seams, and pin/clip as needed. The needle will puncture the tissue and it will tear off easily after you're done sewing. I have done this twice with a laminated fabric and it worked nicely. Off to the fabric store to pick out some prints for my mixer cover!
ReplyDeleteJust wanted to say that I'm nearly done (bottom binding is all that remains) and this is an excellent tutorial! I do have a question about the bottom binding where it meets the ends of the front and back binding - do you fold the bias tape under and end it at each corner, or do you fold the end binding one direction or the other an bind over it? This is the first time I've ever sewn binding. Thank you!
DeleteI usually just fold in the unsewn end and overlap it with the other end.
Deletewhat panel do you use for the sides thanks
ReplyDeleteYou have to download the pattern for the front and back panels.
Delete